17 July 2023

How to upgrade an Imprivata G3 appliance to a G4 appliance?

1. What do you need?

  • 2 running Imprivata Appliances 
  • Imprivata appliance version 7.8 or higher (check Imprivata documentation for details)
  • G4 Appliance downloaded from Imprivata Support page
  • Imprivata G4 license file
  • Space for two new Imprivata Appliances on your hypervisor, on the same subnet as the existing appliances, preferable on the same host.

2. Create G4 appliances

  • Import the (first) G4 OVA into your Hypervisor
  • Power on after import, do not touch the console
  • Import the (second) G4 OVA into your Hypervisor
  • Power on after import, do not touch the console

3. Create enterprise export

  • Logon to the G3 Appliance Console (http://ApplianceName:81)
  • Goto systems tab, Operations
  • Click on Open export wizard -> Start a new Export


  • Click Start export, download export when ready
  • Enter your superadmin credentials when prompted


4. Configure G4 appliances

  • Power on the two new G4 appliances 
  • Configure network settings with temporary IP addresses
  • Reboot appliances

5. Import Enterprise export

  • Goto appliance Console (https://appliance_ip:81) of first appliance
  • Accept license agreements
  • Click Next
  • Select recreate an existing enterprise from a export file
  • Click next
  • Select your export file, enter the password if encrypted

  • Click Next
  • Enter the Temp IP addresses of your new appliances and select Database and Service
  • Click next when ready
  • Upload the G4 license file
  • Click start import
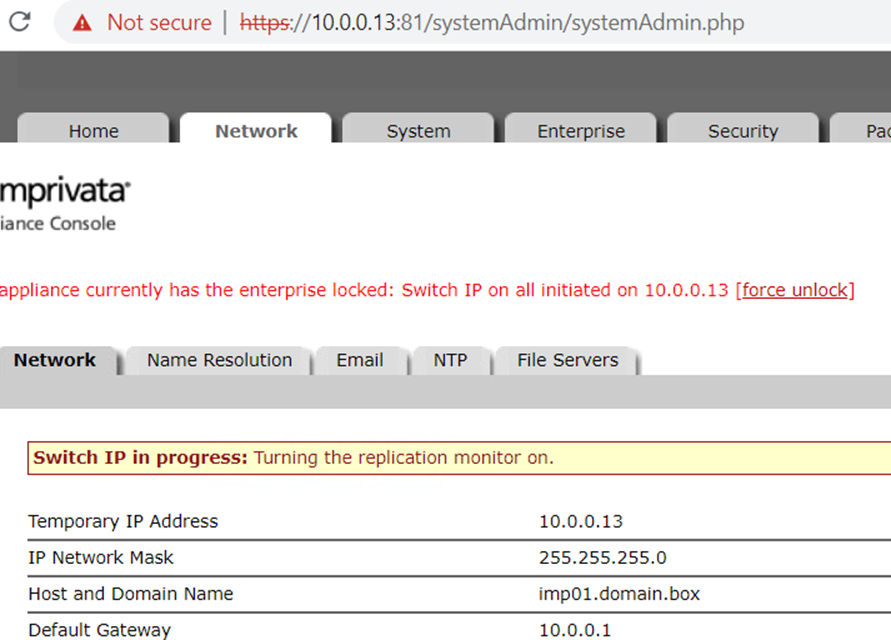
  • Now get some coffee and wait


  • The second appliance should look like this while importing 


  • Refresh your browser


  • Both new appliances can be accessed via https://appliance_temp_ip:81


  • Logon with your Superadmin account

  • Logon with your admin account to  the Admin Console via https://appliance_temp_ip


  • The new site is up and running


6. Setup Client testing

How to test the new appliances before going into production?
By changing a simple registry key on a client device, communication is redirected to the new appliances.

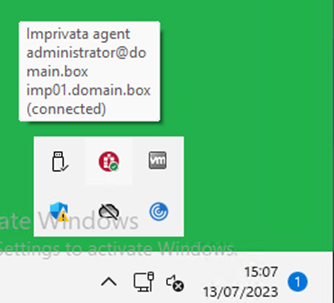
  • Connected with production Appliance

  • Change this replace this IP address with new Temp IP and reboot the device.

  • Connected with the new appliance after the reboot.
  • Do this test for endpoints and servers.

7. Switch to production

  • The following steps will cause down time of Imprivata for approximately 30 minutes.
  • Logon to the new appliance at https://appliance_temp_ip:81
  • Goto network tab

  • Click on Switch to production


  • Click Ok
  • The Current production Appliances must be switched off before the switch to production can be executed.

  • Logon to the production appliances via https://production:81
  • Got to operations tab
  • Click on Appliance operations
  • Shutdown this appliances 

  • Shutdown the second appliance (and third)
  • Start switch to production again
  • Switch is in progress


  • When switch is ready, the appliances will reboot automatically 
  • Logon to workstation and check if Imprivata is connected and working as expected

8. Client upgrade

  • When the appliance upgrade is ready. All clients must be upgraded with the new client.


23 September 2019

How to create a keytab file for Imprivata with Kerberos authenticating.


To use Kerberos authentication with Imprivata you to create KeyTab file which needs to be uploaded to the Imprivata appliance.  Creating a keytab file can be time consuming if it is your time. There are tutorials from Microsoft like this one here. These are long and not written for Imprivata. This tutorial is s only for Imprivata.

To create a KeyTab file for Imprivata we need the following before we can start

- Working Active Directory
- Domain Admin account
- Working Imprivata Appliance
- Windows Client with Imprivata One Sign Agent installed
- Imprivata Admin account

Logon to a Windows Client which has an Imprivata client installed. Use your Domain admin credentials. Start a command prompt via ISXRunAs.exe

"c:\Program Files (x86)\Imprivata\OneSign Agent\ISXRunAs.exe" cmd.exe

Goto the OneSign folder and start  ISXKerbUtil.exe


Enter the credentials of your Imprivata appliance.


In some scenarios this does not work.


There is a fix for this.

Logon to your Domain Controller and create a drive mapping to your Windows Client with the Imprivata agent. Start a command prompt and goto the OneSign Agent folder and start ISXkerbUtil.exe.


Enter the Imprivata appliance IP


Enter Imprivata account in UPN style.
Use a new password for the keytab file.


Succesfull created a keytab file.


29 October 2018

Intune with BitLocker on Hyper-V


Make sure your TPM Chip is working on your host machine.


image


Create a VM in Hyper-V.

image

image

image

Select Generation 2

image

image


Check if your VM has external network access


image


image

Choose install operating system later

image

image

Goto Settings of your VM

image

Goto security

image

Enable TPM and Click Apply.

image


Install your Operating system now.


If this happens, wait for your VM to start and click on Enhanced Session

image image


Log in with your Intune account


image

Start Bitlocker


image

Turn Bitlocker on

image

image

Click next

image

Click next

image

Click next

image

Choose your option and click next

image

Next


image

Start Encryption

image

Encryption is running. This can take some time to complete.

image


The error below occurs when a Generation 1 VM is used instead of Generation 2.


image

How to upgrade an Imprivata G3 appliance to a G4 appliance?

1. What do you need? 2 running Imprivata Appliances  Imprivata appliance version 7.8 or higher (check Imprivata documentation for details) G...